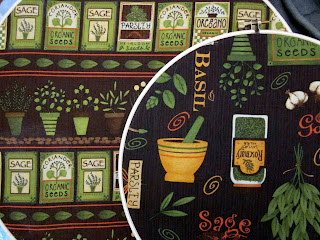
This is one of my favorite quick & easy craft projects. It's very versatile and a super solution for an empty wall. They can be for a temporary fix or permanent, it's up to you!
For your fabrics you can use all the same or ones that compliment each other. I personally prefer a few different fabrics. For example I used three different patterns with herbs for in my kitchen. The embroidery hoops come in a wide range of sizes and can be found at your local craft or hobby store like JoAnn fabric and crafts. They'll super cheap, less that a couple of dollars each. My personal preference is to utilize different sizes of hoops. Depending on the size of the space either 2 or 3 sizes.
Okay, now that we have our supplies, lets make some fabric hoops! All you need to do is place the fabric hoop on the back side of the piece of fabric. If your fabric has different patterns on it, make sure that you place the hoop over the part you want. Then cut the fabric about 1/2 of an inch wider than the hoop.
Open your fabric hoop and stretch the material over the inside hoop, checking that the fabric is oriented in the direction that you want it to be. You will be hanging the piece from the clasp.
Once you have the fabric stretched tightly (you don't want it sagging in the middle), it is time to glue it. You want to glue the side of the fabric to the side of the interior hoop. I close the outer hoop to help hold my fabric tight, making sure the clasp is completely shut.
Using your glue gun, put lines of glue along the inside and press the fabric to it. Make sure that you're keeping the fabric tight. It doesn't matter if the glued part looks perfect, just as long as it will hold! :)
To make these you'll need:
Fabric(s) of your choice
Embroidery hoops
glue (I used a glue gun)
You'll also want to find you scissors, hammer, and some nails. :)
For your fabrics you can use all the same or ones that compliment each other. I personally prefer a few different fabrics. For example I used three different patterns with herbs for in my kitchen. The embroidery hoops come in a wide range of sizes and can be found at your local craft or hobby store like JoAnn fabric and crafts. They'll super cheap, less that a couple of dollars each. My personal preference is to utilize different sizes of hoops. Depending on the size of the space either 2 or 3 sizes.
Okay, now that we have our supplies, lets make some fabric hoops! All you need to do is place the fabric hoop on the back side of the piece of fabric. If your fabric has different patterns on it, make sure that you place the hoop over the part you want. Then cut the fabric about 1/2 of an inch wider than the hoop.
Open your fabric hoop and stretch the material over the inside hoop, checking that the fabric is oriented in the direction that you want it to be. You will be hanging the piece from the clasp.
Once you have the fabric stretched tightly (you don't want it sagging in the middle), it is time to glue it. You want to glue the side of the fabric to the side of the interior hoop. I close the outer hoop to help hold my fabric tight, making sure the clasp is completely shut.
Using your glue gun, put lines of glue along the inside and press the fabric to it. Make sure that you're keeping the fabric tight. It doesn't matter if the glued part looks perfect, just as long as it will hold! :)
Now you just have to wait for the glue to dry and it's done!! Just hang it from a nail by the clasp.
We aren't done yet! :) If you don't like the natural color of the wood embroidery hoop, paint it! This can be an accent color, a color from the fabric, or even the color of your walls to make the hoop blend in more. The options are endless, have fun!


No comments:
Post a Comment
I love getting love! And I can't wait to hear what you have to say, bring it on!! And many thanks for taking your time to visit! :)