Monday, October 31, 2011

Tzatziki Sauce!!!!


I've proclaimed my love for many things on this blog, but none of them come near my love for Tzatziki sauce. Or cucumber sauce as my hopeless American friends often call it. :) This stuff is a requirement for gyros and souvlaki along with anything else I can dip into it, including my fingers.


I have had many friends ask me how to make this and I often look at them with a blank stare. I make it all the time yet I never pay attention to how I'm making it. So this afternoon I attempted to do just that...write down what I was doing. My notes have a lot of scratches on them, but it sounds right!

Here are the ingredients you'll need:

1 large cucumber
2 Tbl Olive Oil
2 1/2 cups Greek Yogurt
1/2 Tbl Lemon Juice
2 garlic cloves, diced
1 1/2 Tbl fresh dill, chopped
Salt & Pepper

A note about Greek yogurt before we get started. YES you need Greek yogurt, "American" yogurt is not the same. Greek yogurt is much thicker, you can strain the other stuff but it still won't come out right. Different taste and a different consistency. Another thing, Greek yogurt has become very popular in the past couple of years, which has made it easier to purchase (yeah!). It also has made it so there are many companies producing yogurt that isn't...well, very Greek (boo!). I've been happy with Fage brand. I do suggest if you're in doubt over the brand to go ahead and strain it. You can do this by putting a coffee filter in a strainer and adding the yogurt, unless you have a yogurt strainer! Just let it sit for at least an hour.


Now, the cucumber. It needs to be peeled, seeded, and diced. To seed it, just cut it in half long ways and slide a spoon down to remove the seeds. Now, the second very important thing. Put the diced cucumber into a strainer and sprinkle a small amount of salt on it. Let it sit for about an hour. Cucumbers have an amazing amount of water, you need to remove as much of the water as possible. If you skip this step you'll end up with runnier tzatziki sauce.


Now comes the easy part! Simply add all of the items together in a large bowl and mix well. Add salt & pepper to taste. I probably add about 1/4 teaspoon of salt and 1/2 teaspoon of pepper. 


That's all you need to do! Your dip is officially ready. I recommend refrigerating it for a few hours before you eat it, it helps the flavors blend together. This dip is really easy, so enjoy!


Sunday, October 30, 2011

Colored Sugar Sprinkles

You can easily pick up colored sugar sprinkles at the store for a couple of dollars per small bottle. But, if you're like me you either don't have the color you need or they've turned into one solid chunk of sugar. Not to fear, making your own is simple and only takes a few minutes.


You'll need:

Food coloring
Raw sugar


I assume you could use regular white sugar, but the consistency of the raw sugar is more like the sprinkles you purchase in the store.

For each color, put 1/4 cup of sugar in a container that has a lid. I use the tupperware containers I plan to store the sprinkles in. Then add 8 drops of food coloring

Take a whisk (or anything) and stir the sugar and food coloring


You don't need it to be perfectly distributed with the whisk. Instead, simply put the lid on and shake!


Viola! Colored sugar sprinkles! You can make whatever colors you want and only as much as you need. Easy and cheap...my favorite things!


Oobleck

If you haven't experienced Oobleck, then you must. The name is stolen from the Dr. Seuss book "Bartholomew and the Oobleck." Oobleck (or ooze, goo, or whatever you want to call it) is a non-Newtonian fluid. This means it acts like a liquid and a solid. If you pour it, you have a liquid. If you apply force to it, then it acts like a solid. It can also act like a babysitter, providing hours of cheap entertainment.

I have a million things to get done today, the pile of boxes in the dining room is continuous reminder of the packing I need to do. Instead I decided to make Oobleck for my husband, who had not experienced it before.

All you need is some starch, water, and food coloring (optional). You want to put 1 1/2 - 2 parts corn starch with 1 part water. For example:


1 1/2 - 2 cups corn starch
1 cup water
5 drops food coloring

I start with 1 1/2 parts and then add more corn starch if it isn't "acting" correctly. If your oobleck is too runny and not performing as a solid when you're being forceful, then add some more corn starch.

The food coloring is completely optional. Be warned, it can cause some colorful fingers. If colored fingers scare you then I would stick to white Oobleck. The Oobleck itself washes off easily with water.


Mixing together the corn starch and water can get a little...interesting. Remember, Oobleck acts as a liquid when poured. So as you're attempting to mix it, be gentle. Eventually it will mix together. Now, all that is left to do is have fun! Grab your Oobleck in your hand and then watch it ooze back out like water. Oh, I don't suggest doing this over the carpet. Maybe a counter or covered surface. (If it does get on the carpet, just use water to clean it up)


Oobleck is so cool that my husband stopped playing Zombie games on the Xbox to play with it! Now, that is amazing if you ask me. 


Friday, October 28, 2011

Must. Stop.Crocheting.

I blame these yarns for my inability to get anything done lately. But they're just so beautiful!


This yarn and this website with a cute crochet idea (from my sister-in-law), have given me plenty to do during the day. Then you add in pinterest and the day is gone. I've been doing school work during dinner. This combined with a move looming in the future and....I'm behind on baking. And packing. But I have some really cute crocheted hats laying all over the place. Now they just need some little heads to go on. 

Friday, October 21, 2011

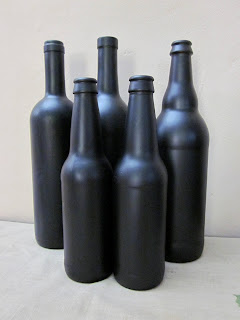
A Bottle of Wine & A Can of Spray Paint

I've been obsessed with Chalkboard paint since I found out it existed. Then they made it in spray paint form and life got even better. I saw this idea on pinterest and had to try it.

All you need is an empty wine bottle (or any bottle for that matter) and a can of chalkboard spray paint. You can find the paint at most anywhere that sells paint, including craft stores. I saw it at Michaels for $8, but since I'm thrifty I prefer to purchase it at Wal-Mart for $4!


The first thing you need to do is get the labels off of your bottles and make sure the inside smell is cleared out. I just fill the sink up with dish soap and let them soak until the label peals off. If there is any sticky stuff left on the bottle, make sure you that scrub that off.


Once your bottles are clean and dry, take them outside to get ready to spray! No using spray paint indoors. :)


Be sure to follow the directions on your spray paint in case they are different. Obviously you want to spray your bottles. Insure that you keep your can of spray paint at a distance of approximately one foot from the bottle. Spray in light coats, moving around the bottle. If you spray too close or too much at once, then you'll end up with drips. Multiple thin coats are better than single heavy ones.

 After spraying the first time, allow the bottles to dry and then spray them a second time. 


When you're done spraying, allow the bottles to dry for 24 hours to insure they're completely dry. 


Then you need to prime them by rubbing the side of the chalk all over the bottle and then wiping it off. Once you've done this, you're bottles are done and ready for your creative ideas!


I've heard lots of fabulous ideas for using these bottles. One of my favorites was as table pieces at a wedding. Just use your imagination and some pieces of chalk. And I hope that you're a better chalk artist than I am, I need an artsy friend to come visit and decorate mine. :) Or maybe my niece.


Tuesday, October 18, 2011

Flat Bread Time!!

I'm a fool for Flat Bread. And in the past I always bought it at the store because I thought I could never make it on my own. The real truth is that making flat bread is extremely simple! And most likely you'll have the majority of the ingredients in your pantry already.

2 packets of active dry yeast
1 tsp sugar
2 1/4 cups all purpose flour
2 Tbl olive oil
1 1/2 tsp Sea Salt (plus some extra for topping the bread)

You'll also need about a cup of warm water...not burning hot, around 110 degrees.

Now, a concern I had was that I don't have a dough mixer...you don't need one. I personally didn't use a mixer at all, I did it the old fashioned way. (By hand in case you were wondering!)


Start by getting your yeast, put it and the sugar into a small bowl.

Set this aside and let it stand for ten minutes, it will get bubbly.


In a large bowl (or your mixer bowl) combine two cups of the flour, the olive oil, and the salt. Next add the yeast/sugar mixture and still together.


You are wanting to make a soft dough, that is what the other 1/4 cup of flour is for. Add it as needed.


Now you need to allow the bread to rise for an hour. It will double in size. Just throw a towel over the bowl. Make sure it's a clean one. =]


I passed the hour by looking at the pretty roses my husband had just bought me. 

Next, grab a baking sheet and spray it with non stick spray. Push your dough down and pull it from the bowl. Shape it into a ball and put it on the baking sheet. Spread it out into a circle that is about a foot wide and 1/2" thick. 


Cover it back up with a clean towel and let it rise another 30 minutes. 


Preheat the oven to 400 degrees. 

When your dough is ready and risen, make little dents in it with your fingers. Rub olive oil across the top and sprinkle it with salt. You can also use you imagination at this point and put herbs or garlic on it. Or in the last few minutes sprinkle it with parmesan cheese. 


No laughing at my dents, I'm not the best. Now put your dented dough into the oven and bake for about 20 minutes, depending on your oven! You want it to be a nice golden brown. Pull it out and enjoy! 


Cinnamon Crumble Muffins

I don't have any photos of these babies because they don't last long enough! Also because they're usually being made early in the morning and I'm not awake yet. :)
Here's what we'll need:

1 1/2 cups flour
1/4 cup sugar
1/4 cup brown sugar
1/8 teaspoon salt
2 teaspoons baking powder
2 teaspoons cinnamon
1/2 cup (single stick) melted butter
1 egg
1/2 cup milk

For the Topping:

1/3 cup quick oats
1.4 cup brown sugar
3 Tbl flour
1 1/2 tsp cinnamon
3 Tbl  melted butter

Preheat your oven to 350 degrees. Either grease or put paper liners in a muffin tin.

Then we're going to mix together the dry ingredients: flour, sugars, salt, baking powder, and cinnamon in a large bowl.

In a small bowl, mix together the butter, egg, and milk. Once they're mixed, add them into the dry ingredients and stir together.

Pour the mixture into muffin tins, only filling them around 2/3 of the way full. (It should make about a dozen)

Now mix together all of the items for the topping. Once they're mixed well, sprinkle it over the muffins.

Bake your muffins for about 25 minutes until a toothpick inserted in the middle comes out clean. Let them cool a little, but not too much! They taste the best still warm. :)

Also, you can always change these up a little. Try adding 1 1/4 cups of fresh raspberries, cooked apples, some nuts, or whatever you want. Just add the fruits right before pouring into the muffin pan. They're quick, easy, and delicious! 

Monday, October 17, 2011

Great project with Embroidery hoops!

This is one of my favorite quick & easy craft projects. It's very versatile and a super solution for an empty wall. They can be for a temporary fix or permanent, it's up to you!


To make these you'll need:

Fabric(s) of your choice
Embroidery hoops 
glue (I used a glue gun)

You'll also want to find you scissors, hammer, and some nails. :)

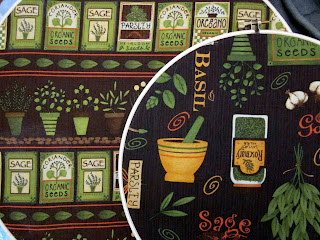
For your fabrics you can use all the same or ones that compliment each other. I personally prefer a few different fabrics. For example I used three different patterns with herbs for in my kitchen. The embroidery hoops come in a wide range of sizes and can be found at your local craft or hobby store like JoAnn fabric and crafts. They'll super cheap, less that a couple of dollars each. My personal preference is to utilize different sizes of hoops. Depending on the size of the space either 2 or 3 sizes.

Okay, now that we have our supplies, lets make some fabric hoops! All you need to do is place the fabric hoop on the back side of the piece of fabric. If your fabric has different patterns on it, make sure that you place the hoop over the part you want. Then cut the fabric about 1/2 of an inch wider than the hoop.


Open your fabric hoop and stretch the material over the inside hoop, checking that the fabric is oriented in the direction that you want it to be. You will be hanging the piece from the clasp.


Once you have the fabric stretched tightly (you don't want it sagging in the middle), it is time to glue it. You want to glue the side of the fabric to the side of the interior hoop. I close the outer hoop to help hold my fabric tight, making sure the clasp is completely shut.

Using your glue gun, put lines of glue along the inside and press the fabric to it. Make sure that you're keeping the fabric tight. It doesn't matter if the glued part looks perfect, just as long as it will hold! :)


Now you just have to wait for the glue to dry and it's done!! Just hang it from a nail by the clasp.


We aren't done yet! :) If you don't like the natural color of the wood embroidery hoop, paint it! This can be an accent color, a color from the fabric, or even the color of your walls to make the hoop blend in more. The options are endless, have fun!


Friday, October 14, 2011

Cilantro Jalapeno Hummus!

Cilantro Jalapeno Hummus is one of my most favorite sandwich spreads! I thank Panera Bread for encouraging my addiction with their Mediterranean Veggie sandwich! Here is what you'll need:

1 can chick peas
1/2 cup chopped cilantro
1 Tbl Tahini Paste
2 Garlic Cloves
1 1/2 Tbl Lemon juice
1-2 Jalapenos (depending on how hot you want it)
2 Tbl Olive Oil
1 Tbl Cumin
2 Tbl Water (approximate)

Put all of the ingredients except for the water into a food processor.


Process until smooth, adding the water to achieve the texture that you want. More water will make it creamier.


I personally love to use this hummus on my sandwiches in place of other condiments. It's also great just to dip hummus or veggies into. Enjoy!!!


Wednesday, October 12, 2011

While we're talking soup...

What is it about tomato soup and a grilled cheese sandwich that tastes sooooo good when you're feeling under the weather? I almost want to get sick just to have them!


Related Posts Plugin for WordPress, Blogger...