Monday, May 7, 2012

Hummus & Spinach stuffed Portabellas


I got this idea from the hummus melts I previously blogged about here. I love Portabella mushrooms, no matter the size. They are great for so many different recipes. The large caps are fantastic to use as a bun or to replace the meat on a burger. They are my newest obsession as I find places to get rid of bread and use them in place. And this is my favorite!

  What you'll need to make 4

(4) large portabella caps
Olive Oil...maybe 3 Tablespoons total (or any other oil)
Pepper
(4) large handfuls of spinach (or if you purchase a 5 oz package, use it all because it'll cook down a lot)
(2) garlic cloves, diced
Hummus, find the recipe here
Cheese for the top (I use an Italian blend with some feta)

First you need to prepare the mushrooms Preheat the oven to 450 degrees. Remove the stems and wipe them down. I save my stems to use in a pasta sauce. Put your caps gill side up onto a baking sheet and drizzle a little oil onto them, not too much. You can also crack some pepper over the top if you want.

Cook your caps for about ten minutes. While they're cooking I get the spinach started. Heat approximately 2 tablespoons of oil over medium heat and and sauté your garlic until fragrant, just a few minutes. Add the spinach and cook until wilted.

Pull out your mushroom caps and turn the broiler on high.

  Fill each cap with hummus, I put a couple of spoons full. Then top each with 1/4 of the spinach and sprinkle the cheese over it all.
I'm not sure why I took a photo before I put the cheese on. I might have been too busy sneaking bites of cheese. Once they're ready, put them under the broiler for a few minutes. Just long enough to make the cheese crispy. Enjoy...I know I did! :)

Friday, May 4, 2012

Mediterranean Chicken Kabobs


  I was at the market the other day and came across a display of wonderful smelling rosemary plants...for $2 a piece! So of course one had to come home with me. I planted it outside the back door and immediately began planning all the adventures my rosemary plant and I would have.

  I like meat on a stick. It's divine. I like rosemary too. So I chose to make some Mediterranean flavored chicken kabobs. Easy and delicious! This recipe will feed approximately 4 people, or dinner for two with leftovers for lunch the next day. 


4 lb Boneless, skinless chicken breasts (we buy a family pack which has 5 in it)
3/4 cup olive oil
1 TBL fresh Thyme, diced
2 TBL fresh Rosemary, diced
Zest of 1 lemon
2 Lemons, juiced
4 garlic cloves, diced
1/4 tsp pepper
Vegetables for grilling (optional...we usually use portabella mushrooms and a red onion)

Mix all of your ingredients (except the chicken) together in a bowl

  Take your chicken breasts and chop then into about 1" size pieces. Then I like to use gallon storage bags to marinate my meat in. For this I divided the chicken and the marinade into two separate bags and I allowed them to marinate over night for lunch the next day. Give the meat at least two hours in the mixture.

  If you're going to use vegetables, I chop them about 30 minutes before I plan on cooking the meat. Then I throw them in a little mixture of lemon and some herbs with a small amount of olive oil. Just enough to coat them. I let them sit (in the fridge) while I get the grill started.

 When you're ready, get your charcoal (or gas) grill going. Or in my case, tell your husband to. Thread your chunks of chicken and (if using) vegetables onto skewers. I put the skewers on the grill and cook the chicken for a total of 20 minutes, but I turn them every 5 so they cook evenly. The time depends a lot on the size of your pieces of meat and how hot your grill is. Just make sure that your chicken is cooked through to 165 degrees. Pull off the skewers and enjoy!

  If you don't have access to an outdoor grill, you can always cook these under your broiler. I don't think they taste as good, but it's better than nothing!

Tuesday, May 1, 2012

Brussels Sprouts: Oh My!

  Okay, don't run away. Brussels Sprouts are fabulous, you just have to cook them right. We go through them like crazy in our house. I just bought almost four pounds of them today and they'll be gone before the weekend. My husband asks for them, I think he'd take them for every meal.
  To start off, a little brussels sprouts information. Try to get smaller ones, I've found that they taste better. The bigger ones will need to be cooked a little bit longer.

Okay! Time to make brussels sprouts! Preheat your oven to 400 degrees

12 brussels sprouts (or how every many you want!)
Olive Oil, approximately 1-2 Tablespoons
Salt
Pepper

Cut the stems off of your brussels sprouts. Then you want to cut them into wedges, depending on the size 2 or 4 pieces. Top them with olive oil and stir so that they are all nicely coated. Next crack fresh pepper and sea salt over them.

  Lay the brussels sprouts out on a baking sheet in a single layer. Bake them for 15 minutes until they're nice and crispy...and ready to eat!

  I like to serve them with this Spicy Aioli I love. To make it you'll need

1/2 tsp cumin seeds
1/2 tsp coriander seeds
1/2 cup mayo (I use fat free!!)
2 Tbl fresh lemon juice
2 Tbl Olive Oil
1 garlic clove, diced
1 1/2 tsp smoked paprika

Mix all of the ingredients together and it's ready. You can make this aioli before hand and refrigerate for up to 24 hours. Another option is to make a garlic aioli. Just get rid of the cumin, coriander, and paprika. Add a couple tablespoons of fresh chopped parsley.

Monday, April 30, 2012

Lavender Infused Chocolate Cake


  My beautiful sister-in-law introduced me to the world of infused cakes and I immediately fell in love. When I first heard her say 'lavender infused,' I just smiled and thought "what?" in my head. Lavender, like what I use in my bath? She had me from the first bite though and now lavender has found a place in my kitchen, actually one of high visibility next to my other favorite items. <That's it's little home in the jar!>


  This has become my "go to" cake for events of all types, including holidays and birthdays. Here is the way that I make it and what you'll need:

2 cups all purpose flour
2 1/2 cups sugar
3/4 cups unsweetened cocoa powder
2 Tbl baking soda
1 tsp slat
1 cup vegetable oil
1 cup sour cream
1 1/2 cup water
2 Tbl distilled white vinegar
1 1/2 tsp vanilla extract
2 eggs
2 Tbl of lavender petals.

  Here is the deal with the lavender petals, you need to insure that they are food grade lavender. You can't just use a random plant that you find! I found them at a tiny shack of a spice shop! Most spice shops should carry them. If you can't find any, Planters Seed Company carries them and you can order online (just search lavender). Now you want to grind them, I personally use a coffee grinder because it works fabulously! From personal experience, I'd suggest picking up a second one or no matter how much you wash it...your coffee will have a lavender flavor to it. :)

  Preheat your oven to 350 degrees. Butter three 8" round pans on the side and bottom. Then, cut out parchment circles and put them on the bottom and then butter those. This makes sure that your cake doesn't get stuck to the bottom and ruined!

  Next, in a large bowl mix together your flour, lavender, sugar, cocoa, salt, and baking soda. Next whisk in the sour cream and the oil until well blended. Add the water slowly. Blend the vinegar and vanilla into the mixture. Beat in the eggs until blended completely. 

  Now, spread the batter evenly between the three pans. 

  Bake for about 30 minutes or until a toothpick inserted in the center comes out clean. Let the cakes cool in their pans for about 20 minutes. Then get the cakes out of the pans and allow to cool completely. Then put them in the freezer for about 30 minutes until firm. Now they're ready to frost!

I followed my sister-in-law and ice mine with a buttercream icing. I used one from Food Network that can be found here. I did not put the rum or the espresso powder in it though. 

  This icing is soooo good! The recipe makes way more than you need, but I usually make the entire recipe so I can taste test it a lot. =]

  Now that you have your cakes and you have your icing, you're ready to go! Ice the first cake, then put the next cake on top of it and ice it. Do this again for the final cake. You're finished, and try not to eat the cake before your company arrives. 


Sunday, April 29, 2012

Happy Mojito Land


I've seen a lot of posts lately about mojitos, which of course made me want one. They're often mentioned in relation to Cinco de mayo, but in reality they are a Cuban drink. That is unless you replace the rum with tequila. My husband and I think that mojitos are best enjoyed in Ybor City with a nice cigar while listening to Cuban music.

I can't say that I have a recipe that I use each and every time I make mojitos, I like to play around with it. Plus depending on how I'm feeling I might double up the amounts of rum. And the rum amounts get larger the more mojitos that I have. But that is another story.

I personally don't like to taste the rum in my drink much at all, so I make a sweeter mojito. Here is how we do for a basic mojito, acceptable to drink any day of the week.

First you will need to make a simple sugar. The amount you'll need depends on how much you plan on drinking! The ratio is one part water to one part granulated sugar. I usually start with one cup of water and one cup of sugar. Put your mixture in a small pot and heat until your sugar has dissolved completely. Pull off and it's ready to use.

5-6 fresh mint leaves
1/2 tsp powdered sugar (my not so secret secret ingredient)
juice from 1/2 of a lime
2 oz simple sugar
2 oz of 10 Cane Rum (This is our favorite!)
splash of club soda
ice :)

First put your mint leaves, powdered sugar, and lime juice in a glass and muddle them with your muddler. I love that word...muddler.

That is a muddler in the photo above, in case you aren't familiar with them. Basically it's a wooden stick that you use to kind of crush the mint leaves. If you don't have one, you can always use the end of a serving spoon or anything else you can find.

Once you're all muddled, fill the glass with ice. Then add the rest of the ingredients: the simple sugar, rum, and club soda. Stir your drink and you're ready. On that note, I'm ready for another one....


P.S. I would have taken a beautiful photo of this wonderful drink outside in the sunshine with the bay in the back ground. But....by the time that I was able to actually sit down and drink one, the sun had been down for hours. :)

P.P.S. Too sweet for you? You have a couple of options. Add a little extra rum or lime juice. Or you can hold back on the simple sugar. Play with it, make it your own!

Friday, April 27, 2012

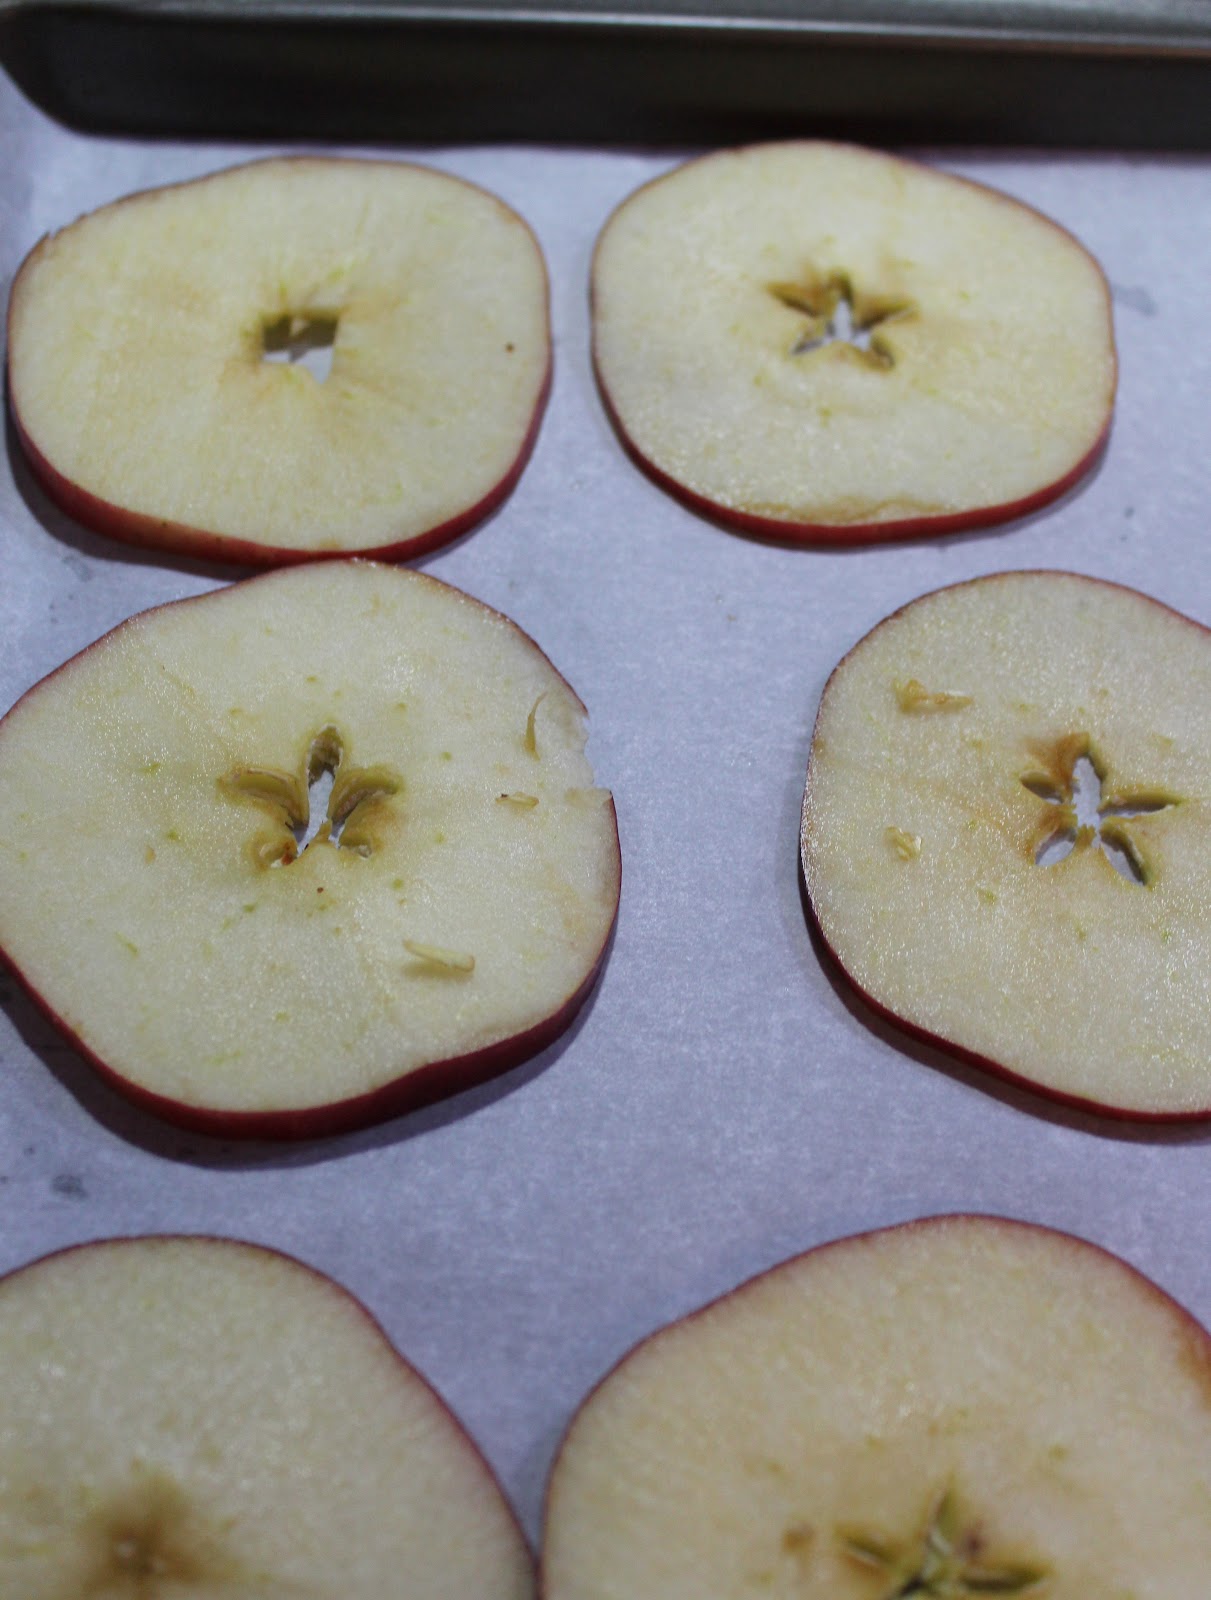
Baked Apple Chips

I have a love/hate relationship with baked apple chips. I love to eat them. I hate to make them because I want to eat them now!!! Really though, it's often really hard to wait for them to be done. Last night I decided I had to have apple chips. Tonight we have no apple chips left in our house. Anywhere. Trust me, I've checked a few times.

All you really need to make some basic apple chips are....wait for it....apples! Surprised? =] Oh, and a baking sheet and an oven. If you have a mandolin to slice your apples with, that will help a lot. But no worries if you don't, you'll just want a small sharp knife.

Preheat your oven to 200 degrees

Grab however many apples you want. One? Twenty? It's up to you. Slice them thinly, about 1/8".

Line your baking sheet with parchment paper and place the apples on it in a single layer insuring that they don't overlap.

If you just want plain apple chips, then skip over the next part and proceed to baking them.

Or, you can make cinnamon/sugar chips! You can make your own mixtures using just cinnamon, just sugar (granulated or powdered), or a mixture of the two. I like to use powdered sugar and cinnamon. Mix about 2 Tbl powdered sugar with 1/2 tsp of ground cinnamon and shake it over the top of your apples. You might need more or less depending on how many apples you use. I usually do a couple at a time. 

Once you're apples are ready, put them in the oven. Bake them for one hour and then pull them out and carefully turn them over. If you're doing the sugar mixture, I usually add a little to the other side at this point. Put them back into the oven and back approximately another hour. The apples should be dried out, but not burnt. Pull out and enjoy...I never give them a chance to cool but start eating them right away! :)


Tuesday, April 24, 2012

Middle Eastern Spiced Chicken


  I like chicken. I really like chicken made outside on the grill because that means the husband is going to help cook it! We use a basic, old school charcoal grill. I've never switched over to gas and have actually only used a gas grill one while we were living in the hotel recently. So in other words I have no clue how to use a gas grill or what temperature to cook chicken on it. Plain and simply, I'm a charcoal fan, it's what I grew up on and it just seems right. :)

  Boneless chicken breasts on the grill are fantastic!! Ours always turn out incredibly juicy and irresistible. We use countless different sauces, marinades, and spices depending upon our mood or what is closest at hand. But this one has quickly become our most favorite ever. The flavors are fantastic and we just can't get enough.

  First things first, when marinating chicken (and some other meats) I love to use a gallon sized zip lock bag. I find that it's the best way to insure you get marinade over the entire piece of meat and it doesn't take up much room in the fridge. Plus, you can simply toss it afterwards and not worry yourself with clean up.


  Here is what you'll need:
2 Boneless chicken breasts 
3 cloves of garlic, diced
3 Tbl Lime juice (we're on a lime kick, but you can also use lemon juice if you prefer)
2 Tbl Olive Oil
1/4 tsp salt
1/4 tsp thyme (fresh if possible)
1/4 tsp fresh ground black pepper
1/4 tsp cayenne
3/4 tsp paprika
1 tsp cinnamon

  Mix all of the ingredients (except chicken) together in the bag. Then add the chicken. Allow the chicken to marinate at least 2 hours. Sometimes I throw it in the bag in the morning to be used for dinner that evening.

  When it's close to dinner time, light your grill and get it ready. Put the chicken on the grill. I've found that it takes 15 minutes per side to be perfectly cooked, but be sure to check your temperature. When it's cooked to 165 degrees then it's ready! Enjoy!!


Related Posts Plugin for WordPress, Blogger...